Esp8266
目的
本文介紹怎樣玩esp8266
概述
基于乐鑫esp8266的NodeMcu开发板,具有GPIO、PWM、I2C、1-Wire、ADC等功能,结合NodeMcu 固件为您的原型开发提供最快速的途径。
esp8266有如下固件
- Arlandu固件,用c寫代碼
- nodemcu,用lua寫代碼

nodemcu lua编程指南
如何 构建固件
这里可以看到支持的模块以及文档

usb连接以及驱动安装
将esp8266通过usb2线连接到电脑
电脑安装CH340驱动,安装之后会在电脑的设备管理器有一个COM口出现
下载固件,以及flash到esp8266
参考如何 刷入固件 以及如何 上传代码和 NodeMCU IDE

lua编程1:让板子上的灯闪烁
代码
-- 1.blink.lua
pin = 4 -- gpio pin
gpio.mode( pin, gpio.OUTPUT )
for i=1,100 do
    gpio.write( pin, gpio.LOW )
    tmr.delay( 500000 ) -- delay 0.5 second
    gpio.write( pin, gpio.HIGH )
    tmr.delay( 500000 ) -- delay 0.5 second
end
代码介绍。该灯连接到的是gpio4,代码首先设置该端口为输出端口(为什么要设置输入还是输出,好像跟电路相关,具体忘了那里讲过来着),然后代码
以上代码会hang住,因为他有个无限长的for loop。其实他还有一个timer的功能,这个是non blocking的
代码2:
pin = 4 -- gpio pin
gpio.mode( pin, gpio.OUTPUT )

value = gpio.LOW
local function blink()
    gpio.write( pin, value )

    if value == gpio.LOW then
        value = gpio.HIGH
    else
        value = gpio.LOW
    end
end

local function setuptimer(callback)
    local time1 = tmr.create()
    time1:alarm(30, tmr.ALARM_AUTO, callback)
    return time1
end

setuptimer(blink)
编程2:DHT11温度测量
硬件简介:
| DHT22接腳 | NodeMCU接腳 |
|---|---|
| VCC | 3.3V |
| GND | GND |
| Data | D5 |
print('test dht')
Temp_Humi_Pin = 5
time1 = tmr.create()

function Acquire_Data()
   status,temp,humi,temp_dec,humi_dec = dht.read11(Temp_Humi_Pin)
   print("temp:"..temp,"  humi:"..humi)
end


Acquire_Data()
time1:alarm(1500, tmr.ALARM_AUTO, Acquire_Data)
Remarks: dht是自己的私有协议,有人用lua写了测试程序可以看看
使用 ESPlorer 撰寫 NodeMCU 程式 @ No More Codes :: 痞客邦 :: (pixnet.net)
他的标准库在这类
https://github.com/nodemcu/nodemcu-firmware/blob/release/app/dht/dht.h
关于代码为什么这么写,建议找个dht11的spec看一下
led 測試
https://blog.csdn.net/tiandiren111/article/details/109040567
dht11
https://blog.csdn.net/CATTLE_L/article/details/91128601
编程3:4针OLED使用
硬件简介:
该led使用i2c接口,esp8266又一个i2c的库,使用软件实现了i2c接口。用户需要置顶sda, scl两条线的引脚名
测试代码:
  -- 管脚定义
    local sda = 2
    local scl = 1
    local sla = 0x3c  -- oled的地址,一般为0x3c
    -- 初始化
    function init_oled()
        -- iic总线 和 oled初始化
        i2c.setup(0, sda, scl, i2c.SLOW)
        disp = u8g2.ssd1306_i2c_128x64_noname(0, sla)
        -- 设置字体
        disp:setFont(u8g2.font_unifont_t_symbols)
        disp:setFontRefHeightExtendedText()
        --disp:setDrawColor(1)
        disp:setFontPosTop()
        --disp:setFontDirection(0)
        -- 画边框
        --disp:drawFrame(0, 0, 128, 64)
    end
    -- 显示函数
    function oled_show_msg()
        -- 设置显示内容
        disp:drawStr(0, 0,  "1 Hello OLED")
        disp:drawStr(0, 16, "1234567890123456789")
        disp:drawStr(0, 32, "Li Jing Jing")
        disp:drawStr(0, 48, "He Jin Shou")
        -- 将内容发送到oled
        disp:sendBuffer()
    end
    -- 主函数
    function main()
        init_oled()
        oled_show_msg()
    end
    -- 运行程序
    main()
https://github.com/nodemcu/nodemcu-firmware/blob/136e09739b835d6dcdf04034141d70ab755468c6/app/modules/u8g2.c
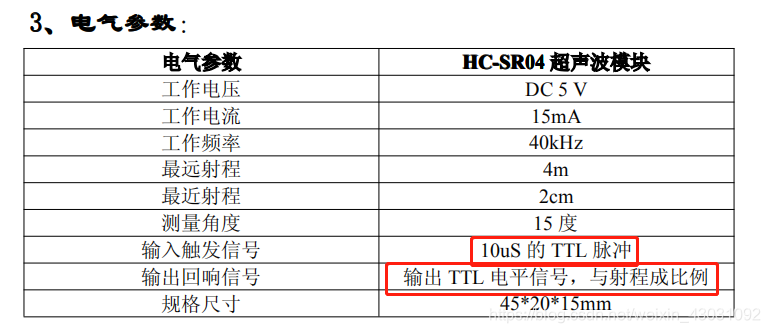
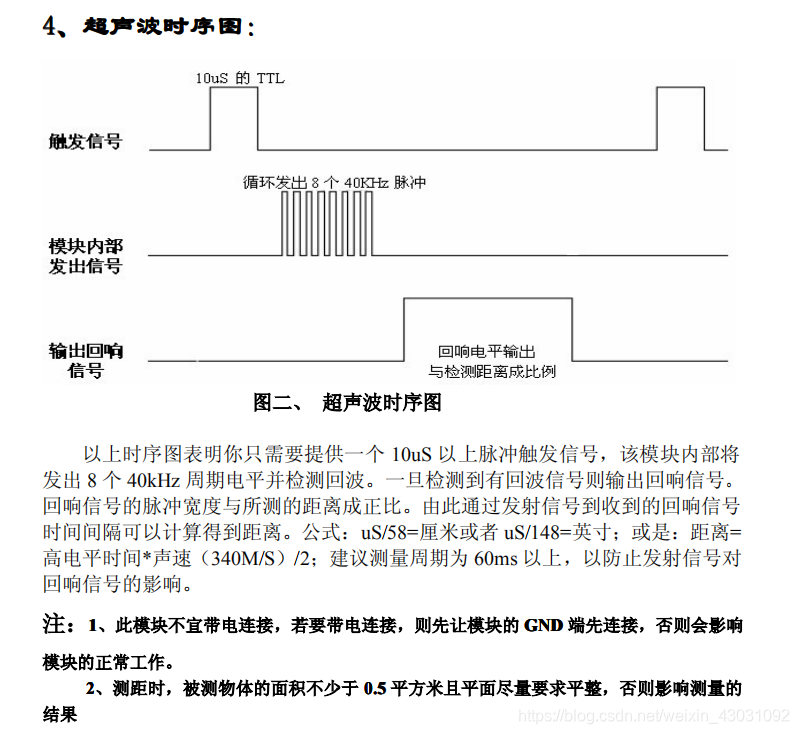
编程4:ch-sr04超声测距
硬件信息
引脚连接
除了gcc, gnd之外,trig连接D7,echo连接d6
--[[
// Clears the trigPin
digitalWrite(trigPin, LOW);
delayMicroseconds(2);

// Sets the trigPin on HIGH state for 10 micro seconds
digitalWrite(trigPin, HIGH);
delayMicroseconds(10);
digitalWrite(trigPin, LOW);

// Reads the echoPin, returns the sound wave travel time in microseconds
duration = pulseIn(echoPin, HIGH);

// Calculating the distance
distance= duration*0.034/2;
// Prints the distance on the Serial Monitor
Serial.print("Distance: ");
Serial.println(distance);
delay(2000);
]]

trigPin = 7
echoPin = 6
LOW = gpio.LOW
HIGH = gpio.HIGH

function digitalWrite(pin, value)
    --gpio.mode( pin, gpio.OUTPUT )
    gpio.write( pin, value )
end

function delayMicroseconds(ms)
    tmr.delay(ms)
end

function pulseIn(pin)
    gpio.mode( pin, gpio.INPUT )
    while gpio.read( pin ) ~= HIGH do
        tmr.delay(1)
    end

    local t1 = tmr.now()
    while gpio.read( pin ) == HIGH do
        tmr.delay(1)
    end
    local t2 = tmr.now()

    return t2-t1
end

function measure()
    --// Clears the trigPin
    gpio.mode( trigPin, gpio.OUTPUT )
    digitalWrite(trigPin, LOW);
    delayMicroseconds(2);

    --// Sets the trigPin on HIGH state for 10 micro seconds
    digitalWrite(trigPin, HIGH);
    delayMicroseconds(10);
    digitalWrite(trigPin, LOW);

    --// Reads the echoPin, returns the sound wave travel time in microseconds
    duration = pulseIn(echoPin);
    --print('duration', duration)

    --// Calculating the distance
    --distance= duration * 0.034/2.0;
    --// Prints the distance on the Serial Monitor
    --print("Distance: ", distance);
    print('duration', duration, 'distance is', duration / 58, 'cm')
end

local function setuptimer(callback)
    local time1 = tmr.create()
    time1:alarm(1000, tmr.ALARM_AUTO, callback)
    return time1
end


setuptimer(measure)
参考资料
用8266学习单片机-13-HC-SR04超声波模块测距示例-Ultrasonic-US-015_esphome声波测距校准_Kearney form An idea的博客-CSDN博客
编程5:sg50私服马达控制
硬件简介
连线

我的连线为
- PWm连接D4
代码
pin = 4
-- set pin index 1 as pwm output, frequency is 50Hz,
pwm.setup(pin, 50, 1024*3/40)
pwm.start(pin)

-- Position 0
-- 20ms cycle, High duration is 20ms * 7.5% = 1.5ms
for i=1,2,0.1 do
    -- pwm.setduty(pin, duty):duty 0~1023, pwm duty cycle, max 1023 (10bit)
    pwm.setduty(pin, 1024*i/20)
    print(tmr.now())
    tmr.delay(1000000)
end
referece
nodemcu板子
接口指南 https://zhuanlan.zhihu.com/p/477322369
Arduino固件
https://zhuanlan.zhihu.com/p/477322369
dht11測量溫度
https://lights.ofweek.com/2020-10/ART-11000-2200-30463617.html
nodemcu 固件
https://ghostyguo.pixnet.net/blog/post/168300185-%E4%BD%BF%E7%94%A8-esplorer-%E6%92%B0%E5%AF%AB-nodemcu-%E7%A8%8B%E5%BC%8F
ESP8266开发板NodeMCU 资料:
链接: https://pan.baidu.com/s/1n8gJToN1acbyyiwZ5Jvcsw 提取码: ni62 NodeMCU 烧录固件教程:https://www.cnblogs.com/0pen1/p/12592906.html
DHT11温湿度教程
https://www.jianshu.com/p/3aba3ce1ad12
1.44 Arduino黑色+ESP8266黑色开发板: http://www.lcdwiki.com/zh/1.44inch_SPI_Arduino_Module_Black_SKU:MAR1442 这个是单独另外参考资料 学习资料免费链接: https://pan.baidu.com/s/1TRTU1f-35HpKSUEhKegHKQ 提取码: vttk
ESP826 6针OLED
ESP826 6针OLED:https://blog.csdn.net/weixin_45631738/article/details/105961924 4针OLED: https://blog.csdn.net/weixin_42268054/article/details/104254955?utm_medium=distribute.pc_relevant.none-task-blog-BlogCommendFromMachineLearnPai2-2.channel_param&depth_1-utm_source=distribute.pc_relevant.none-task-blog-BlogCommendFromMachineLearnPai2-2.channel_param
ESP8266开发板OLED链接: https://pan.baidu.com/s/1fDAF_-fAYEO6jh0c-FaYqg 提取码: 4k2s 复 OLED烧录教程:https://blog.csdn.net/weixin_45611006/article/details/109399946(简单说可以提示手动安装这个库 只需要安装ssd1306和u8g2的库就可以,写程序只要调用就可以了)
ESP8266开发板+SG90舵机教程
ESP8266开发板+SG90舵机教程:https://blog.csdn.net/weixin_42268054/article/details/104735122 舵机如果只有90度 Servo库的默认脉冲时间为544-2400 μs(即 servo.attach(Servo_pin,544,2400)),而实际需要的脉冲为500-2500 μs,因此我们改一下默认的attach()定义就好了。 因此将servo.attach(Servo_pin)改成servo.attach(Servo_pin,500,2500)就大功告成了。
OLED教程是倒数第2网盘
esp8266玩法总结
。使用arduino ide,参考教程,youtube https://youtu.be/29dfYc4Xldk 。nodemcu固件,使用ESPlorer程序,直接lua编程 。esphome固件,不用编程,直接用yaml配置和ha通信
通过 NodeMCU 使用 HC-SR04 进行距离测量
https://www.instructables.com/Distance-Measurement-Using-HC-SR04-Via-NodeMCU/
https://blog.csdn.net/weixin_43031092/article/details/106899984
https://randomnerdtutorials.com/esp8266-nodemcu-hc-sr04-ultrasonic-arduino/
https://atceiling.blogspot.com/2017/03/arduino_28.html
https://github.com/loiphin/ESP8266/blob/master/hcsr04.lua
https://github.com/vsserafim/hcsr04-nodemcu/blob/master/hcsr04-simple.lua
https://blog.csdn.net/lzlxlzy/article/details/123614107
https://stackoverflow.com/questions/32428274/nodemcu-esp8266-hc-sr04-tmr-now-difference-is-incorrect